TIP: We recommend restoring to the last saved baseline first before doing the given steps below to make sure that guest user data is wiped off and not saved on the new baseline.
From the client PC you can either manually reboot (if set to automatically restore on reboot) or go to Restore Settings > Restore Now
From the Endpoint Manager. Right-click a client or group > go to Restore Baseline > Restore the System Baseline > OK

This shows up on the client side and will reboot the PC
SCENARIO 1
If the changes you need to make do not require a reboot (i.e. add a document / change wallpaper on the desktop, small updates or install a program that does not require a reboot to complete, etc.)
From the client side
- after you've made your changes. Open Reboot Restore client > go to Update > click the "New Baseline" top button


- That's it. The current system state is now your new baseline. The previous baseline then becomes the Last Known Good Baseline which you can go back to under More Tools
From the Endpoint Manager (Enterprise / Pro)
- Right-click a connected client or group > click New Baseline. You'll see the prompts below

Then this
Then click Close
SCENARIO 2
If the changes you need to make require a reboot (i.e. install a program, normal Windows Updates and some 3rd party software updates ) From the client side
- BEFORE making your changes. Open Reboot Restore client > go to Restore Settings > set to Restore on Demand > click Apply

- AFTER the above, you can now install a new program or install updates, and reboot the PC to completely install then and you can reboot multiple times to make sure there are no other pending updates / processes.
Once you're done with the updates..... - go to Update Baseline > click "New Baseline" (it's the top "header" -- it's also a clickable button) --- you'll get a confirmation that a new baseline as set. Screenshots from Scenario 1
- go back to Restore Settings > set to back to "Automatically Restore on every reboot" and any other preferred restore automation.
- That's it. The current system state is now your new baseline. The previous baseline then becomes the Last Known Good Baseline which you can go back to under More Tools
From the Endpoint Manager (Enterprise / Pro)
- BEFORE making changes. Right-click a connected client or group > click Modify Client Settings > Restore Settings > select Restore on Demand > OK > and then Close


You should now see the Restore Settings column in the Endpoint Manager set to "Manual" for those clients
- AFTER the above, you can now install a new program or install updates, and reboot the PC to completely install then and you can reboot multiple times to make sure there are no other pending updates / processes.
Once you're done with the updates..... - Right-click a connected client or group > click New Baseline > Ok on the prompt > then Close (See Screenshots in Scenario 1)
- Then go back to Modify Client Settings > Restore Settings > set to back to "Automatically Restore on every reboot" and any other preferred restore automation > Ok and then Close (See Screenshots in Scenario 1)
SCENARIO 3
If you're trying to manually install a Windows 11/10 Feature Update (23H2 > 24h2) or any other applicable installs/changes wherein the steps in Scenario 2 for some reason won't work. This is also useful if you want to set a new "Back to Start" baseline and clear our disk space if its been filling out over time with the other backup snapshots.
We will be using the protection mode function here. This is more of a "hard switch" that will disable the boot protection and remove all other saved backup baselines(LGK or original baseline)
Follow the TIP at the beginning of this article to make sure that user data is wiped off before following the steps below
From the client side
- go to the Command Prompt (click > Start > run > type in "cmd" or click Start > type in "Command Prompt" and open it
- from the command prompt. Enter the command line below to turn off protection
shdcmd.exe /protect disable /u Administrator /p password
- You'll see the prompts below and the second screen automatically closes once done


- Protection is now disabled. You will not be able to open the Reboot Restore application anymore from the tray icon and the Reboot Restore pre-OS boot screen won't show up anymore.
You can now install Windows Feature Updates and any other major changes you need to do while protection is off. Once you're done with the updates..... - go back to the command prompt
- Enter the command line below to turn protection back on.
shdcmd.exe /protect enable /u Administrator /p password
- The PC will automatically reboot. The pre-OS boot screen will re-activate and the application console will be accessible again after boot
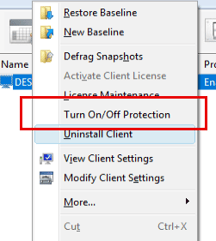
From the Endpoint Manager (Enterprise / Pro)
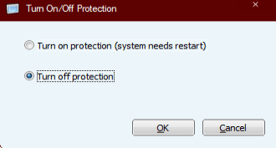
- Right-click a connected client or group > go to Turn On/Off Protection.
Select Turn off protection > then OK
- The protection mode status for PC in the Endpoint Manager will change to "Disabled"

- You can now install Windows Feature Updates and any other major changes you need to do while protection is off. Once you're done with the updates.....
- Right-click a connected client or group > go to Turn On/Off Protection.
Select Turn ON protection > then OK
- The client PCs will then automatically reboot and set Protection Mode back to Enabled
Please submit a ticket if you have any questions or need further clarification on the above steps