Important — Before You Upgrade
Upgrading your client installation will delete all existing snapshots, including the LGK and start baseline. Your system's current state will automatically be set as the new start baseline after the upgrade.
If you're upgrading from an older version (v12, v11, or earlier), a version 13 license key is required to fully activate the upgraded client. Users with an active maintenance package can upgrade their license - submit a ticket to send a request.
In this article
Standalone Upgrade
Upgrading from version 12.x to version 13.x
Upgrading version 13.x to the newest version 13
Additional Upgrade Options/Notes
This upgrade process keeps your current Reboot Restore client settings (restore settings, remote management, etc.).
Standalone Upgrade
- Download the latest version
- Extract the downloaded ZIP file
- Go to Start > search for "command prompt" > run as Administrator

- From the command prompt, navigate to the client installer folder
- Run the command
setup.exe /upgrade /autoinstall
Sample below

- A dialog will show progress and automatically reboots the PC

- Once the PC has restarted, the Reboot Restore has been successfully upgraded. If you used this method on an older client version you will need to activate with a purchased key.
- Refer to Additional Upgrade Options/Notes to include your license key into your setup configuration.
- Refer to Additional Upgrade Options/Notes to include your license key into your setup configuration.
Upgrading from version 12.x to version 13.x
The steps below require Reboot Restore Rx Pro ver 12.7, Build 2710041421 or higher in orders to upgrade to the latest version of Reboot Restore. If your clients are on an older Reboot Restore Rx Pro version, you will need to manually reinstall the client by firstly uninstalling the previous version. For deployment steps after removing the old version, please refer to our Deployment Guide.
1. Update the EndPoint Manager
RECOMMENDATION: Create a backup of your console settings. Open your existing EndPoint Manager, click on EndPoint Manager > Backup Server Database. This will back up user accounts, tasks and custom groups you've configured. 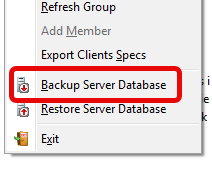
After the upgrade is completed, click on EndPoint Manager > Restore Server Database.
- Download the latest version of Reboot Restore Enterprise to the Endpoint Manager workstation/Server.
- Extract the downloaded ZIP file
- Navigate to the Endpoint Manager folder and run Setup.exe. The following dialog will be presented, click on OK to proceed.

2. Update the Clients from the EndPoint Manager
Include your version 13 key as part of the upgrade package, refer to the Setup INI Wizard section below.
- Select the connected client or group you want to upgrade
- From the menu bar, click on Clients > Deploy Options > Send Files (or right-click on the selected clients or group)

- Select files or folder to send to the clients: Click Browse > select the Reboot Restore client installer folder
- this may be in your Downloads folder
- Target director on the clients: C:\Receive - this is the default location on your protected workstations where the EndPoint Manager will deploy the installation files.
- Run this program on the clients after sending the files: Click the down arrow and select Setup.exe and add the following switches /s after setup.exe. The command should look like this:
C:\Receive\Reboot Restore Client\Setup.exe /s
- Toggle on "Run as localsystem"
- Click OK and a progress dialog window will appear
This upgrade process will remove the currently installed version of Reboot Restore and complete the upgrade process automatically. Once the Clients reconnect to the EndPoint Manager, you can confirm they are on the latest version by adding the "Build #" column to the EndPoint Manager. The build number should match the EndPoint Manager's under Help > About.
To fully activate an upgraded client install, a version 13 license key is required if you're upgrading from an older version (i.e. version 12, 11, etc.). Users with active maintenance package can contact us to upgrade their license to version 13.
Upgrading version 13.x to the newest version 13
The steps below apply to users with version 13.x of Reboot Restore Rx Pro.
1. Update the EndPoint Manager
RECOMMENDATION: Create a backup of your console settings. Open your existing EndPoint Manager, click on EndPoint Manager > Backup Server Database. This will back up user accounts, tasks and custom groups you've configured.
After the upgrade is completed, click on EndPoint Manager > Restore Server Database.
- Download the latest version of Reboot Restore Enterprise to the Endpoint Manager workstation/Server.
- Extract the downloaded ZIP file
- Navigate to the Endpoint Manager installer and run Setup.exe. The following dialog will be presented, click on OK to proceed.
2. Update the Clients from the EndPoint Manager
- From the Endpoint Manager, select the connected clients or the group you want to upgrade
- Click on Clients > Deploy Options > Send Files
- You can also right click on the group or selected workstations

- Select files or folder to send to the clients: Click Browse > select the Reboot Restore client installer folder
- this may be in your Downloads folder
- Target director on the clients: C:\Receive - this is the location on your protected workstations where the EndPoint Manager will deploy the installation file.
- Run this program on the clients after sending the files: Click the down arrow and select Setup.exe and add the following switches /upgrade /autoinstall after setup.exe. The command should look like this:
C:\Receive\Reboot Restore Client\Setup.exe /upgrade /autoinstall
- Toggle on "Run as localsystem"
- Click OK and a progress dialog window will appear (similar to this one)

This upgrade process will remove the currently installed version of Reboot Restore and complete the upgrade process automatically. Once the Clients reconnect to the EndPoint Manager, you can confirm they are on the latest version by adding the "Build #" column to the EndPoint Manager. The build number should match the EndPoint Manager's under Help > About.
Additional Upgrade Options/Notes
Reboot Restore Enterprise includes a package configuration tool, Setup INI Wizard, that allows pre-configure settings into your install package, including adding your license key into your setup package. The Setup INI Wizard tool is located in the Deployment Tools folder.
Include your license key in your installer with Setup INI Wizard
The following two steps are required for users upgrading Reboot Restore Rx Pro ver 12.7, Build 2710041421.
- Using the Setup INI Wizard utility (located under Deployment Tools), it will walk you through all of the usual installation configuration and create a custom setup.ini file. Insert your new license key when prompted.
- In the More Settings step, look for the upgrade=0 switch and change it to upgrade =1
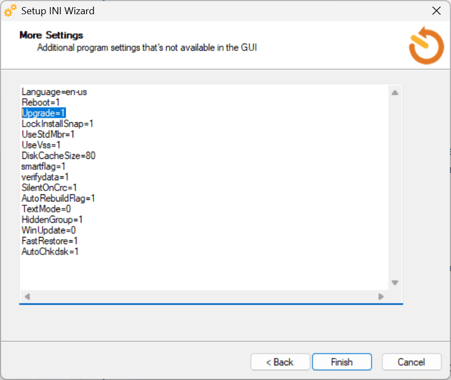
- Save the custom setup.ini file and copy to/overwrite the existing setup.ini file