Installation may be interrupted by the error "Open Protect Sys Failed."
Why Is This Happening?
This error occurs when the two core components of the software — the client and the subconsole — are unable to communicate with each other. When this connection breaks down, the subconsole (the startup screen that loads before Windows) will typically fail to install correctly.
In most cases, the culprit is either a third-party program or a Windows service running on your system that is blocking the connection. The two most common causes are:
- Drive Encryption software — encryption tools that protect your disk can interfere with how the subconsole installs and communicates at the system level (ie: Bitlocker).
- Antivirus programs — security software may flag or block the subconsole's low-level system access, preventing it from functioning correctly.
The sections below will walk you through identifying which of these may be affecting your system and how to resolve it.
Drive Encryption
Version 13 automatically detects if BitLocker is enabled and will prompt you to disable it before installation begins. If you choose to disable it, we recommend waiting for the drive decryption process to fully complete, then rebooting your PC before proceeding with the installation.
Reboot Restore and Rollback Rx Pro use their own built-in encryption to keep your data protected. Unfortunately, Windows only allows one drive encryption program to be active at a time — so if another encryption tool is already running on your system, the two will conflict, which is a common trigger for the "Open Protect Sys Failed" error.
The most frequent offender is BitLocker, Windows' built-in encryption service. BitLocker comes pre-installed on most versions of Windows (11, 10, and select Windows 7 editions) and is worth checking even if you don't remember enabling it. Notably, all Microsoft Surface Pro devices ship with BitLocker turned on by default.
Checking and Disabling BitLocker
If you're unsure whether BitLocker is active, the quickest way to check — and disable it if needed — is directly through Windows. The steps vary slightly by version:
Windows 10 and 11 Pro
- Click the Start button and type "Manage BitLocker", then select it from the results.
- Click Turn off BitLocker.
- Wait for the "Decrypting…" message to disappear — this may take a few minutes depending on your drive size.
- Once complete, reboot your PC before running the installer again.
 |
 |

On certain OEM (manufacturer-built) PCs, BitLocker may appear to be turned off but is actually partially enabled from the factory. You can spot this by a drive icon with an exclamation mark in Disk Management (see screenshot below).
If you see this, the fix is a two-step process: first turn BitLocker on (you'll be given the option to print or save your recovery key — recommended), then immediately turn it back off. Wait for the "Decrypting…" message to disappear, then reboot your PC and run the installer again.
Windows 11 and 10 Home Edition
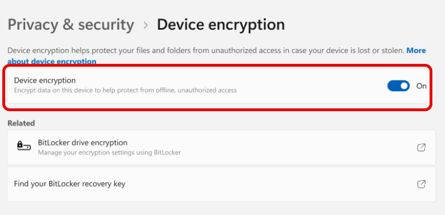
These Windows editions do not include the full BitLocker feature, but your device may have Device Encryption enabled by default from the factory — which can cause the same conflict. Here's how to check and disable it:
- Click the Start button and type "Device Encryption", then select it from the results — or navigate to Settings > Privacy & Security > Device Encryption.
- Toggle Device Encryption off.
- Wait for the "Decrypting…" message to disappear.
- Reboot your PC, then run the installer again
If you're using a third-party drive encryption tool other than BitLocker or Device Encryption, please refer to that software's official documentation to disable or uninstall it before proceeding with installation.
Antivirus, Anti-Malware & Security Suite Software
Some antivirus and security programs may incorrectly identify our installer as a threat (a false positive), which can block the subconsole from installing and trigger the "Open Protect Sys Failed" error. If you suspect this is the case, temporarily disabling your security software during installation is usually enough to resolve it. If you need help disabling a specific program, please refer to that software's official documentation.
Windows Security (formerly Windows Defender) is generally compatible with our installer. However, if you're experiencing download issues or want to disable it as a precaution, follow the steps below.
Temporarily Disabling Windows Security
- Click the Start button, type "Windows Security", and select it from the results.
- Go to Virus & Threat Protection > Manage Settings.
- Toggle Real-time Protection off.
- Proceed with the installation.
- Once installation is complete, return to the same screen and toggle Real-time Protection back on, then set a new baseline snapshot.
Summary & Additional Troubleshooting
In most cases, disabling drive encryption and temporarily turning off your antivirus software will resolve the "Open Protect Sys Failed" error. If the problem persists after completing those steps, the following may also be contributing to the issue:
- Secure Boot is enabled — Some PCs require Secure Boot to be disabled in the BIOS before installation can complete successfully. Please refer to your PC manufacturer's documentation for instructions on how to do this, as the steps vary by device.
- Compressed hard drives — If your drives have file or folder compression enabled, you'll need to decompress them before running the installer.
- Connected USB devices — Before starting installation, unplug any USB flash drives or external hard drives from your PC.
Still having trouble?
Submit a support ticket and our team will be happy to help.